Improve Windows Update for Business management
We all know that the transformation from the good old SCCM/WSUS is hard and from time to time complicated. Of course there are a ton of guides how to manage Windows Update for Business (WUfB) – like this amazing article HERE.
But not all customers are ready for the modern way of update management. In WSUS or even more in SCCM we have a detailed manageability of when to install which update.
This is missing in WUfB since in WUfB we assuming we are installing all updates via the ring model and we don’t need to install updates during a specific time window, or block specific KB’s.
I’ve a few customers that are still not able to adopt WUfB in the current form. They would like to have better control of the update installation – or just want to speed up the installation process with first downloading the updates and then install the updates.
Some of the configuration is possible via the CSP – HERE. You are able to configure the day and the time where Updates should be installed. This functionality can be used together with my script to improve the update performance.
The source files
Just in case you are looking for the source files. They are stored on GitHub HERE
The management options
The script will provide the following configuration options:
- Force Microsoft Update
Since we are not able to overwrite WSUS settings via CSP, this will force the connection to WSUS without deleting any GPO/WU settings. - Direct Download
This will first download all updates and then install them when requested - Enable Maintenance Window
If you enable the maintenance window, updates only getting installed during the time - Start Time
After this time is reached, the update installation will start - End Time
No new update will be installed after the time – currently installing updates will be finished - Day
Choose a day of a week – right now the script only supports a one week interval – if you select “none” updates are available for installation everyday - Hidden Updates
Select KB’s you want to block for installation. Multiple KB’s are comma separated e.g. “KB123123,KB12312312” - Un-Hidden Updates
Select KB’s you want to allow again for installation. Multiple KB’s are comma separated e.g. “KB123123,KB12312312”. If an update is on “Hidden” and “Un-Hidden” list – it will be available for installation.
Still interested? Let’s see how it works and what you need.
How it works
In reality the script is not only one script – there are several parts.
- Profile configurator
- Installation script
- Main script for update installation
Profile configurator
The profile configurator is a GUI for easily create a new profile with all required settings that are listed in “The management options” above.
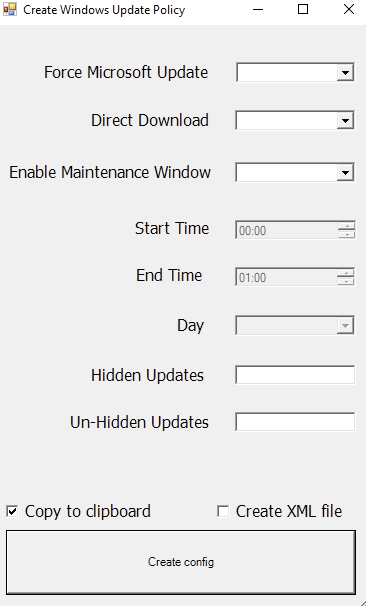
First of all – sorry for the old school GUI. Since it is based on PowerShell and Windows Forms, the design is not that fancy as you might expect.
The first three options – all based on True/False – are required for creating a XML file. For configuring the Start/End time and the maintenance day, you need first set “Enable Maintenance Window” to “True”.
After you configured everything you need, you can choose to copy the finished XML to clipboard and/or to a XML file.
The output should look like this:
<wap-provisioningdoc id="e4feca6a-e8d1-42d6-88dd-281de6b459a5" name="customprofile">
<characteristic type="com.airwatch.winrt.powershellcommand" uuid="2f77119f-765f-489b-80fc-59f5acd7248a">
  <parm name="PowershellCommand" value="Invoke-Command -ScriptBlock {
    New-Item HKLM:\SOFTWARE\Policies\Custom\WindowsUpdate -Force;
    New-ItemProperty -Path HKLM:\SOFTWARE\Policies\Custom\WindowsUpdate -Name DirectDownload -PropertyType String -Value True;
    New-ItemProperty -Path HKLM:\SOFTWARE\Policies\Custom\WindowsUpdate -Name HiddenUpdates -PropertyType String -Value "";
    New-ItemProperty -Path HKLM:\SOFTWARE\Policies\Custom\WindowsUpdate -Name UnHiddenUpdates -PropertyType String -Value  "";
    New-ItemProperty -Path HKLM:\SOFTWARE\Policies\Custom\WindowsUpdate -Name LastInstallationDate -PropertyType String -Value "";
    New-ItemProperty -Path HKLM:\SOFTWARE\Policies\Custom\WindowsUpdate -Name MaintenaceWindow -PropertyType String -Value True;
    New-ItemProperty -Path HKLM:\SOFTWARE\Policies\Custom\WindowsUpdate -Name MWDay -PropertyType String -Value "";
    New-ItemProperty -Path HKLM:\SOFTWARE\Policies\Custom\WindowsUpdate -Name MWStartTime -PropertyType String -Value  00:00;
    New-ItemProperty -Path HKLM:\SOFTWARE\Policies\Custom\WindowsUpdate -Name MWStopTime -PropertyType String -Value 01:00;
    New-ItemProperty -Path HKLM:\SOFTWARE\Policies\Custom\WindowsUpdate -Name UseMicrosoftUpdate -PropertyType String -Value True
}"/>
</characteristic>
</wap-provisioningdoc>
As you can see, I’m using registry keys to manage the device. For this a new registry hive HKLM:\SOFTWARE\Policies\Custom\WindowsUpdate
gets created, every time the profile gets updated – e.g. when you add a new KB to the hidden update list.
Now you know, that the script uses the registry as configuration source and we can manage those settings easily via profile. Let’s see how we can install the script.
Installation script
The installation script does the following:
- Creates a scheduled task to run every X minutes and on every startup
This will trigger the Windows update script - Copy the SearchWindowsUpdate.ps1 to the installation dir you defined
- Copy the PSWindowsUpdate PowerShell module to “C:\Program Files\WindowsPowerShell\Modules”
You have the following parameter for the script:
[string]$LogPath,
[string]$InstallDir,
[int]$UpdateInterval
LogPath – to define the log directory – if not set, there will be no logs generated – e.g. C:\Logs\CustomUpdate
InstallDir – define where the script will be copied – e.g. C:\Windows\CustomUpdate
UpdateInterval – define how often the script will run – in minutes – e.g. 60
The command-line could be look like this:
install.ps1 -LogPath "C:\Logs\CustomUpdate" -InstallDir "C:\Windows\CustomUpdate" -UpdateInterval 120Main Script for update installation
As already mentioned before, the script uses the PSWindowsUpdate script – all Infos regarding the module are HERE.
If you don’t want to deploy the module via Workspace ONE, you can uncomment line 107 to 133. This will install NuGet as package provider and the PSWindowsUpdate module.
Otherwise the script is pretty straight forward and is already explained in the previous topics.
If you need any more information or any other functionality, please leave a comment and I’ll take a look at it.
Deployment
First of all – download the files from GitHub – HERE.
If you want to deploy the script via Workspace ONE, you can zip the following files:
- the “PSWindowsUpdate” folder
- dummy.exe – download it from github, or just create a black textfile and rename it from .txt to .exe
- install.ps1
- SearchWindowsUpdates.ps1
after you created the ZIP file you can upload this ZIP to the console.
As there is no uninstallation, you can just type NA or “-” as uninstall command.
As installation command please use the following:
powershell -executionpolicy bypass -file install.ps1 -LogPath "C:\Temp\Logs" -InstallDir "C:\Windows\CustomUpdate" -UpdateInterval 120Feel free to change as you need it.
For the “When To Call Install Complete” action, check if the file
“C:\Windows\CustomUpdate\SearchWindowsUpdates.ps1”
exists.
If you like, you can add the image as icon.
Deploy the application and you are ready to go.
FAQ
Can I get even more control?
If you want even more control, you can use the Windows Update Profile and set the Auto-Approved Updates settings to “not allowed”. Then only approved updates will be available for installation.
What happens if I’m using a Windows Update profile?
The profile will manage which updates are available for installation.
E.g. you are auto approving security updates, all security updates will be installed – if set to not to use auto-approve, only approved updates by the administrator will be installed
What if I approved an update but set it as hidden update?
The update will not be installed as long as you not unhide it.
Should I deploy the script to every devices even if Windows Update for Business is good enough?
No – only deploy it to devices which really have special needs for update management.
Empowering customers in client management since 2012.
Empowering customers in modern management since 2018.