How to configure and deploy 3rd party application ADMX
It’s a typical request from customers to manage applications like Google Chrome or Microsoft Edge with Workspace ONE Profiles.
We can achieve this via custom profiles and ADMX injection. Camille already wrote a great article on his blog HERE.
I’ll provide you a step by step guide with the example of Microsoft Edge – which is basically the same as Google Chrome.
Step 1 – Preparation
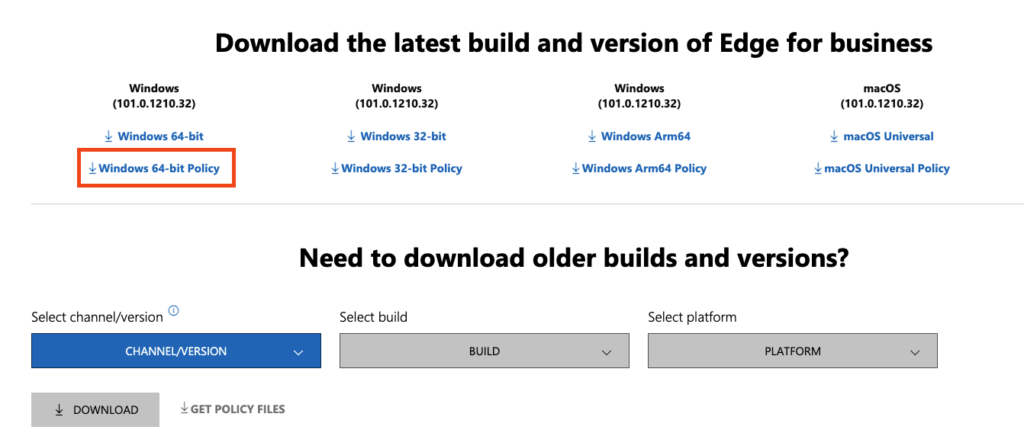
Download the amdx files
Start to Download Microsoft Edge ADMX policies from HERE.
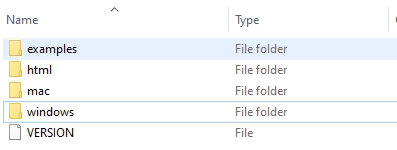
Extract the files
Use the the Windows native tool or any other tool to extract the .cab file and after that the .zip file.
You should now have a folder structure like this:
Navigate to Windows\admx and locate the needed .admx – in the example I’ll use the msedge.admx.
Open this file in an editor of your choice.
Prepare the profile
Once you opened the .admx file, the file looks like this:
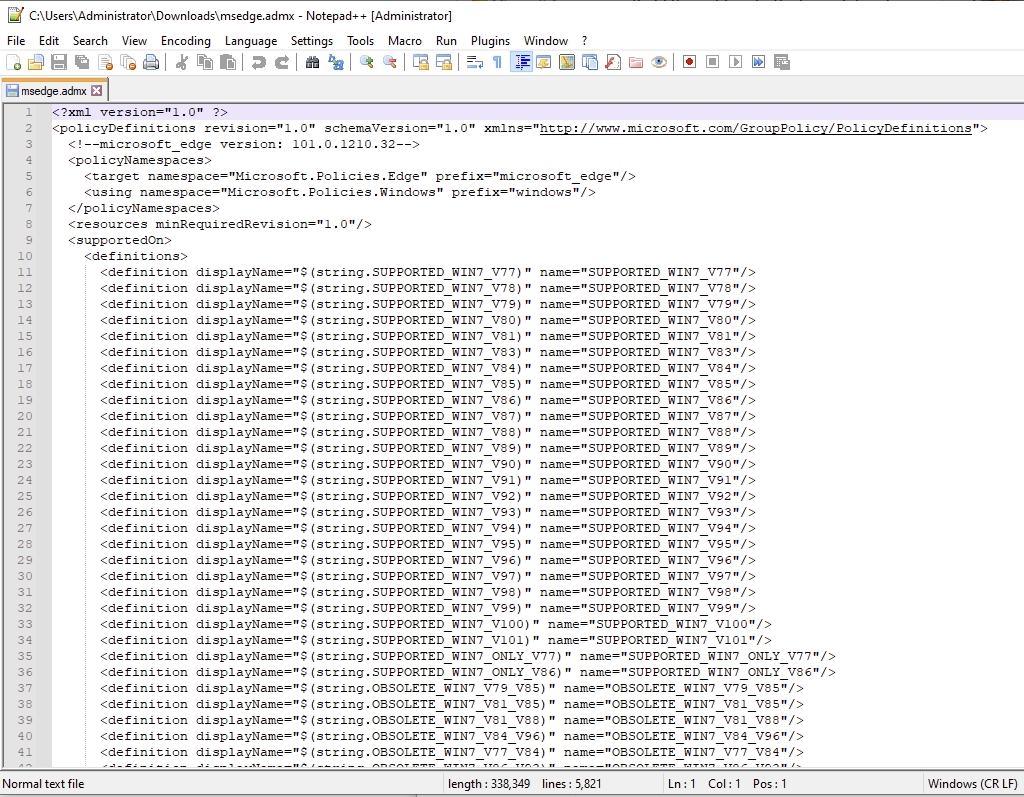
We now need to prepare the file to make our lives a little bit easier.
For this, we need to modify the .admx file and we need to remove the first line.
<?xml version="1.0" ?>If we don’t remove the xml tag, the profile will fail to apply.
Step 2 – Deploy the profile
Create a new custom device profile and choose a name you prefer. I’ll use “Windows – Custom ADMX – Microsoft Edge”. This will help you to identify the profile easily, since we need two profiles for the configuration.
Next, we need to create a xml body for the profile.
<Add>
	<CmdID>00e402b9-1901-4960-bc4b-c9f2ec0cd51c</CmdID>
	<Item>
		<Meta>
			<Format>chr</Format>
			<Type>text/plain</Type>
		</Meta>
		<Target>
			<LocURI>./Vendor/MSFT/Policy/ConfigOperations/ADMXInstall/%NAME%/Policy/%Version%</LocURI>
		</Target>
		<Data>
			<![CDATA[ADMX FILE DATA HERE]]>
		</Data>
	</Item>
</Add>
Make sure you change the CmdID for every profile. The URI is always “./Vendor/MSFT/Policy/ConfigOperations/ADMXInstall” after that you can select a name that fits best for you. The “/Policy/” is always needed and can’t be changed. For the version, I would recommend to use the AMDX version. In our use case I’ll use:
<LocURI>./Vendor/MSFT/Policy/ConfigOperations/ADMXInstall/MSEdge/Policy/101</LocURI>Now paste the modified .admx file data between the brackets of CDATA
<![CDATA[ADMX FILE DATA HERE]]>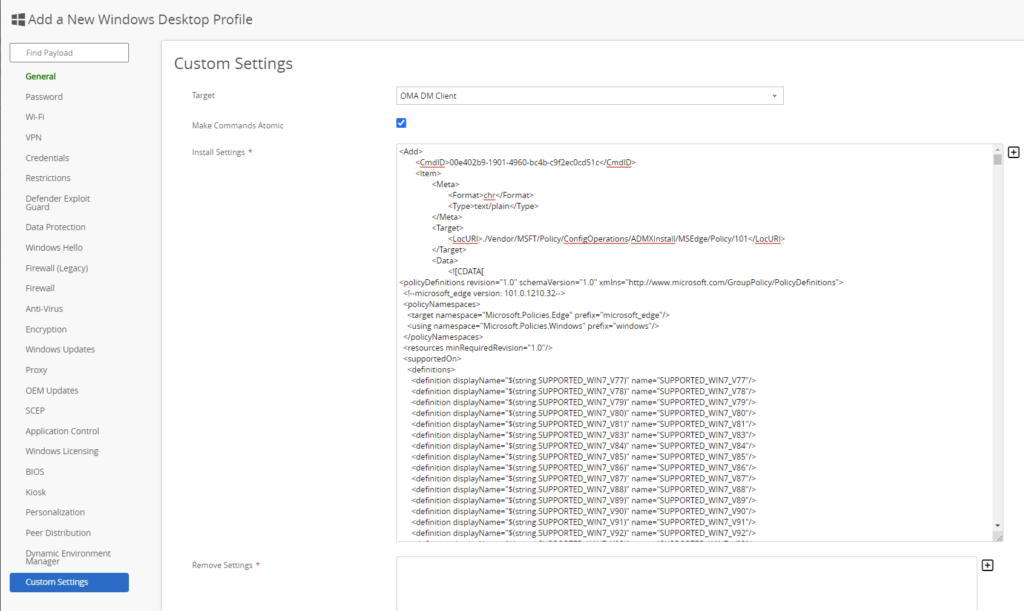
For the “Remove Settings” you can use the following code:
<Delete>
    <CmdID>5131e316-a187-42af-a794-6cb7ad5f286d</CmdID>
    <Item>
        <Meta>
            <Format>chr</Format>
            <Type>text/plain</Type>
        </Meta>
        <Target>
            <LocURI>./Vendor/MSFT/Policy/ConfigOperations/ADMXInstall/MSEdge/Policy</LocURI>
        </Target>
    </Item>
</Delete>
Then you can assign the profile to the device.
Check the installation
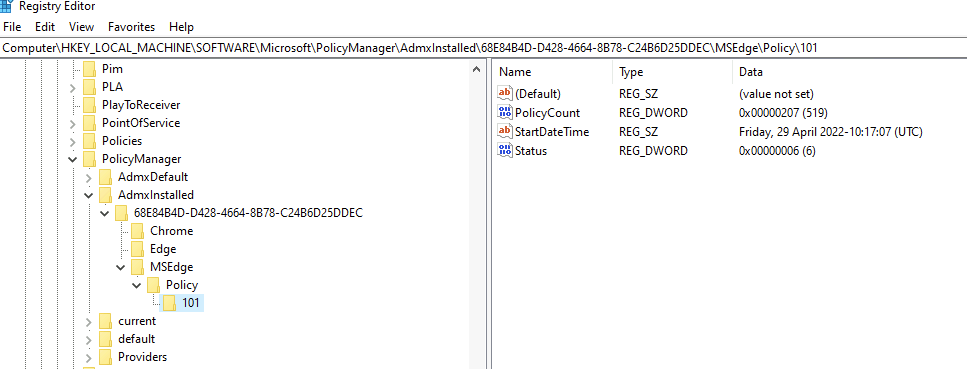
The admx information gets stored in the registry below the registry hive
HKEY_LOCAL_MACHINE\SOFTWARE\Microsoft\PolicyManager\AdmxInstalled\68E84B4D-D428-4664-8B78-C24B6D25DDEC\MSEdge\Policy\101Be aware that the GUID after AdmxInstalled can change due to the enrollment ID of Workspace ONE.
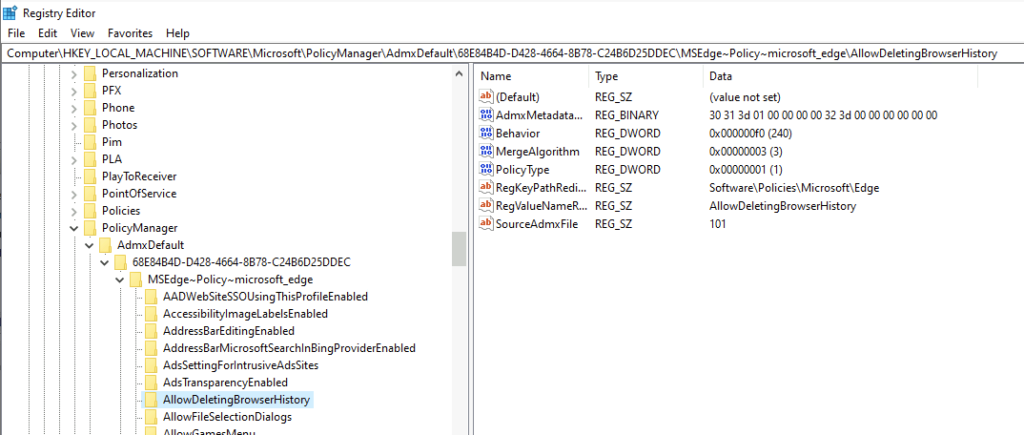
To see which settings are available take a look at the ADMXDefault key under:
HKEY_LOCAL_MACHINE\SOFTWARE\Microsoft\PolicyManager\AdmxDefault\68E84B4D-D428-4664-8B78-C24B6D25DDEC\Again, watch out for the GUID, it might be different on your device.
Now we have the ADMX file installed and we can go ahead and configure the settings that we need.
Step 3 – Working with ADMX setting
Working with admx settings is not really straight forward. You need to know the data type and what you need to configure.
First you need to understand that the URI path is like this:
./Device/Vendor/MSFT/Policy/Config/%POLICYNAME%~Policy~%PARENTCATEGORY%/%SETTINGNAME%- %POLICYNAME%
Is the name that we used in the ADMX installation CSP - Policy
Is always be used and can’t be configured - %ParentCategory%
Is used in the ADMX
The easiest way to get the full path is to lookup the path in the registry.

It is also possible to use the ADMX file to lookup the path and its also required to lookup the needed data to configure the setting.
    <policy class="Both" displayName="$(string.RestoreOnStartupURLs)" explainText="$(string.RestoreOnStartupURLs_Explain)" key="Software\Policies\Microsoft\Edge" name="RestoreOnStartupURLs" presentation="$(presentation.RestoreOnStartupURLs)">
      <parentCategory ref="Startup"/>
      <supportedOn ref="SUPPORTED_WIN7_V77"/>
      <elements>
        <list id="RestoreOnStartupURLsDesc" key="Software\Policies\Microsoft\Edge\RestoreOnStartupURLs" valuePrefix=""/>
      </elements>
    </policy>
This helps you to create the CSP and to lookup the different datatypes.
Here are some examples of data types and the corresponding CSP’s:
Text:
ADMX entry:
    <policy class="Both" displayName="$(string.HomepageLocation)" explainText="$(string.HomepageLocation_Explain)" key="Software\Policies\Microsoft\Edge\Recommended" name="HomepageLocation_recommended" presentation="$(presentation.HomepageLocation)">
      <parentCategory ref="Startup"/>
      <supportedOn ref="SUPPORTED_WIN7_V77"/>
      <elements>
        <text id="HomepageLocation" maxLength="1000000" valueName="HomepageLocation"/>
      </elements>
    </policy>
Converted to CSP:
<Replace>
	<CmdID>706041b2-7109-4fcf-9713-ff753cad2ac9c</CmdID>
	<Item>
		<Target>
			<LocURI>./Device/Vendor/MSFT/Policy/Config/MSEdge~Policy~microsoft_edge~Startup/HomepageLocation</LocURI>
		</Target>
		<Data>
			<![CDATA[<enabled/> <data id="HomepageLocation" value="https://digitalworkspace.one"/>]]>
		</Data>
	</Item>
</Replace>
Setting selection:
ADMX entry:
    <policy class="Both" displayName="$(string.RestoreOnStartup)" explainText="$(string.RestoreOnStartup_Explain)" key="Software\Policies\Microsoft\Edge\Recommended" name="RestoreOnStartup_recommended" presentation="$(presentation.RestoreOnStartup)">
      <parentCategory ref="Startup"/>
      <supportedOn ref="SUPPORTED_WIN7_V77"/>
      <elements>
        <enum id="RestoreOnStartup" valueName="RestoreOnStartup">
          <item displayName="$(string.RestoreOnStartup_RestoreOnStartupIsNewTabPage)">
            <value>
              <decimal value="5"/>
            </value>
          </item>
          <item displayName="$(string.RestoreOnStartup_RestoreOnStartupIsLastSession)">
            <value>
              <decimal value="1"/>
            </value>
          </item>
          <item displayName="$(string.RestoreOnStartup_RestoreOnStartupIsURLs)">
            <value>
              <decimal value="4"/>
            </value>
          </item>
        </enum>
      </elements>
    </policy>
Converted to CSP:
<Replace>
	<CmdID>26e3bd3e-19cd-48ca-874c-d097fb64153c</CmdID>
	<Item>
		<Target>
			<LocURI>./Device/Vendor/MSFT/Policy/Config/MSEdge~Policy~microsoft_edge~Startup/RestoreOnStartup</LocURI>
		</Target>
		<Data>
			<![CDATA[<enabled/> <data id="RestoreOnStartup" value="4"/>]]>
		</Data>
	</Item>
</Replace>
You can see, that you just need to change the value to select the option you want to have.
List:
ADMX entry:
    <policy class="Both" displayName="$(string.RestoreOnStartupURLs)" explainText="$(string.RestoreOnStartupURLs_Explain)" key="Software\Policies\Microsoft\Edge\Recommended" name="RestoreOnStartupURLs_recommended" presentation="$(presentation.RestoreOnStartupURLs)">
      <parentCategory ref="Startup"/>
      <supportedOn ref="SUPPORTED_WIN7_V77"/>
      <elements>
        <list id="RestoreOnStartupURLsDesc" key="Software\Policies\Microsoft\Edge\RestoreOnStartupURLs" valuePrefix=""/>
      </elements>
    </policy>
Converted to CSP:
<Replace>
<CmdID>dbd31dad-854c-4a1e-b7eb-a739fed420d1</CmdID>
<Item>
<Target>
<LocURI>./Device/Vendor/MSFT/Policy/Config/MSEdge~Policy~microsoft_edge~Startup/RestoreOnStartupURLs</LocURI>
</Target>
<Data>
<![CDATA[<enabled/> <data id="RestoreOnStartupURLsDesc" value="1https://digitalworkspace.one"/>]]>
</Data>
</Item>
</Replace>List’s are a little bit different since you need to add the list numbers in front of the actual value. So in this case you need to add “1” to declare this URL as first entry.
Enable / Disable option:
ADMX entry:
    <policy class="Both" displayName="$(string.HideFirstRunExperience)" explainText="$(string.HideFirstRunExperience_Explain)" key="Software\Policies\Microsoft\Edge" name="HideFirstRunExperience" presentation="$(presentation.HideFirstRunExperience)" valueName="HideFirstRunExperience">
      <parentCategory ref="microsoft_edge"/>
      <supportedOn ref="SUPPORTED_WIN7_V80"/>
      <enabledValue>
        <decimal value="1"/>
      </enabledValue>
      <disabledValue>
        <decimal value="0"/>
      </disabledValue>
    </policy>
Converted to CSP:
<Replace>
	<CmdID>c241537a-e3ef-4cef-89d4-bd8f2944f8dd</CmdID>
	<Item>
		<Target>
			<LocURI>./Device/Vendor/MSFT/Policy/Config/MSEdge~Policy~microsoft_edge/HideFirstRunExperience</LocURI>
		</Target>
		<Data>
			<![CDATA[<enabled/>]]>
		</Data>
	</Item>
</Replace>
Decimal:
ADMX entry:
    <policy class="Both" displayName="$(string.TotalMemoryLimitMb)" explainText="$(string.TotalMemoryLimitMb_Explain)" key="Software\Policies\Microsoft\Edge" name="TotalMemoryLimitMb" presentation="$(presentation.TotalMemoryLimitMb)">
      <parentCategory ref="microsoft_edge"/>
      <supportedOn ref="SUPPORTED_WIN7_V80"/>
      <elements>
        <decimal id="TotalMemoryLimitMb" maxValue="2000000000" minValue="1024" valueName="TotalMemoryLimitMb"/>
      </elements>
    </policy>
Converted to CSP:
<Replace>
	<CmdID>378e812c-6d0c-4401-95aa-1b012f50b074</CmdID>
	<Item>
		<Target>
			<LocURI>./Device/Vendor/MSFT/Policy/Config/MSEdge~Policy~microsoft_edge/TotalMemoryLimitMb</LocURI>
		</Target>
		<Data>
			<![CDATA[<enabled/> <data id="TotalMemoryLimitMb" value="2048"/>]]>
		</Data>
	</Item>
</Replace>
Applying the CSP
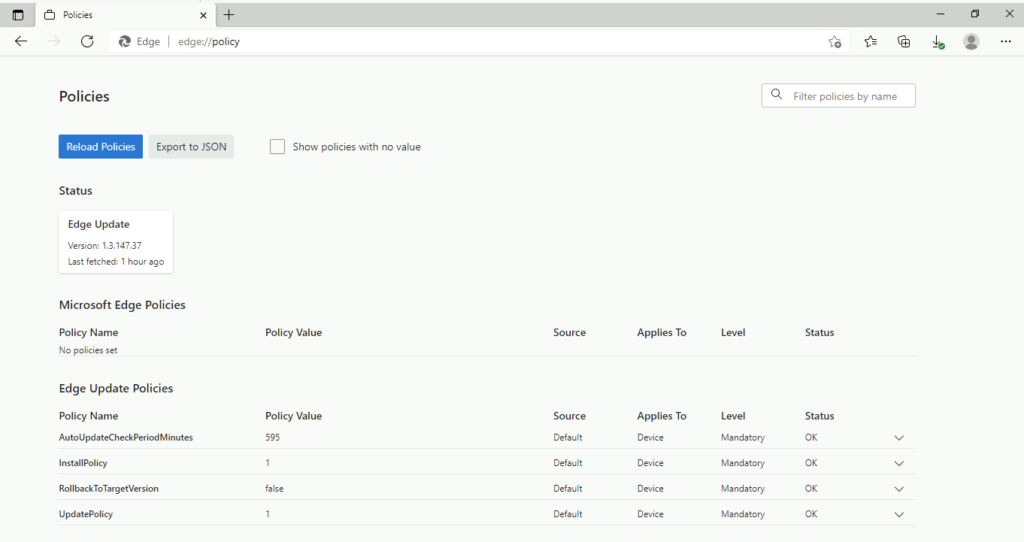
Before we are applying the setting, we can open the Edge browser and navigate to edge://policy to make sure that there are no policies configured.
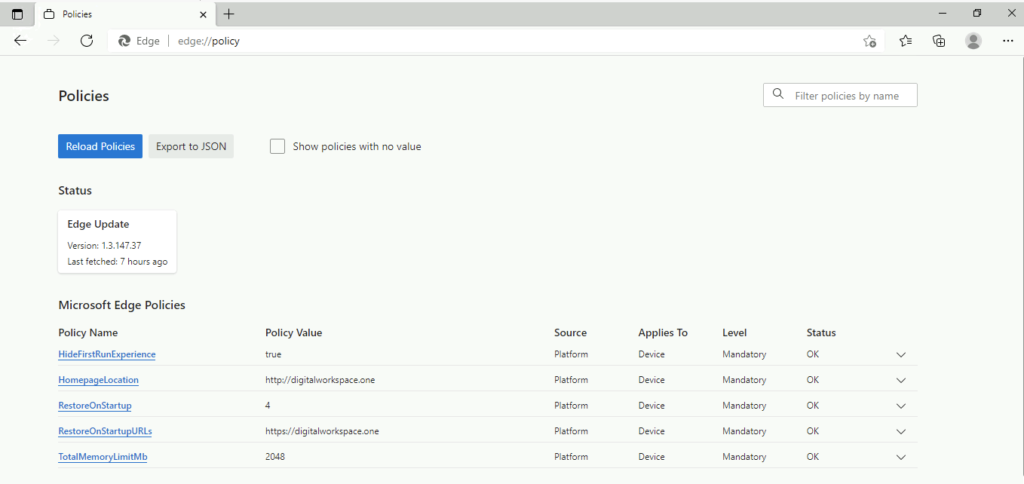
After you created your CSP and assigned it to the devices, refresh the edge://policy website to verify that the settings are applied successfully.
You can also lookup the settings in the registry:
HKEY_LOCAL_MACHINE\SOFTWARE\Microsoft\PolicyManager\current\device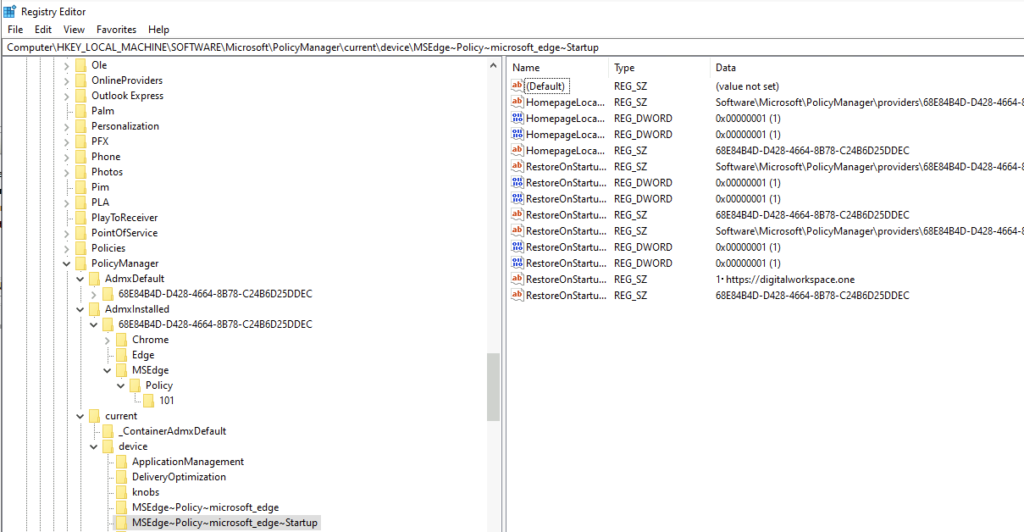
Empowering customers in client management since 2012.
Empowering customers in modern management since 2018.