How to migrate MEM to Workspace ONE
Managing devices with Microsoft tools is nearly as old as Windows itself. Microsoft’s System Center Configuration Manager is maybe the best PC Lifecycle Manager (PCLM) that is currently released. But if you go the full modern management route, SCCM is not the right tool anymore, since it has its powerful features manly in the on-premise world.
Beside switching to a Modern Management tool, you always need to redesign old processes.
This has hopefully already started with the Windows 10 rollout – if not, hurry up to benefit of the Modern Management advantages.
A lot of customers already have Workspace ONE in place for mobile device management (MDM) so leveraging Workspace ONE for Windows 10 is not that far away.
Most PCLM administrators don’t want any trouble during migration and this article will show you, how easy it is to migrate from a Microsoft solution to Workspace ONE.
We have different scenarios how a device could be managed. Overall, we have four scenarios that are slightly different and might have some huddles. I provide all necessary steps and scripts for doing a seamless migration to Workspace ONE.
All scripts and processes need to test and validated in your environment. This article and the scripts are only a guide not a final solution.
Quick Links:
- Scenario 1: SCCM to Workspace ONE
- Scenario 2: MEM to Workspace ONE
- Scenario 3: AD + Intune to Workspace ONE
- Scenario 4: AAD + Intune to Workspace ONE
- Scenario 5: Reset the device
- Optional Improvements
- Final video with the full implementation
Scenario 1: SCCM to Workspace ONE
This scenario is the typical PCLM to Modern Management scenario. We want to migrate away from the legacy PCLM to a modern management solution like Workspace ONE.
It’s no magic to migrate, but we must be aware that with SCCM 1902 Hotfix 1 Microsoft disabled the co-existence support for 3rd party vendors. Which means, that if you have a SCCM agent version higher then 1902, the agent stops working as soon as the Workspace ONE Intelligence Hub gets installed.
Actually, there are three possible circumstances:
1. It doesn’t bother you since your use cases don’t need SCCM anymore
2. You downgrade the SCCM agent to 1902 (the agent will work as normal – there is no maximum or minimum version difference between server and agent). I provided the script here and the SCCM agent is included in the 1902 SCCM ISO image which you get from Microsoft.
Please note that SCCM 1902 is out of support since September 27, 2020.
3. You are still on SCCM agent version 1909 or lower.
Prerequisites
There is not much to do. Go to www.getws1.com, download the newest agent and create a new SCCM application. Since it is a .MSI its pretty straight forward.
Use the command line and staging option of the MSI – see this LINK.
Basically, it’s this command for installing:
msiexec /i AirWatchAgent.msi /q ENROLL=Y SERVER=ds135.awmdm.com LGName=techzone USERNAME=stagingtechzone PASSWORD=P@ssw0rd ASSIGNTOLOGGEDINUSER=Y DOWNLOADWSBUNDLE=FALSE /LOG %temp%\WorkspaceONE.logI changed the DOWNLOADSBUNDLE to FALSE to avoid the installation of the “old” Workspace ONE app.
Just deploy the Workspace ONE Intelligence HUB to the devices you want to enroll.
You can also use a script to always download the latest available version:
$WebClient = New-Object System.Net.WebClient

$WebClient.DownloadFile("https://storage.googleapis.com/getwsone-com-prod/downloads/AirwatchAgent.msi","C:\temp\AirwatchAgent.msi")
Migration steps
- Download Workspace ONE Intelligence HUB
- Import it to SCCM as Application
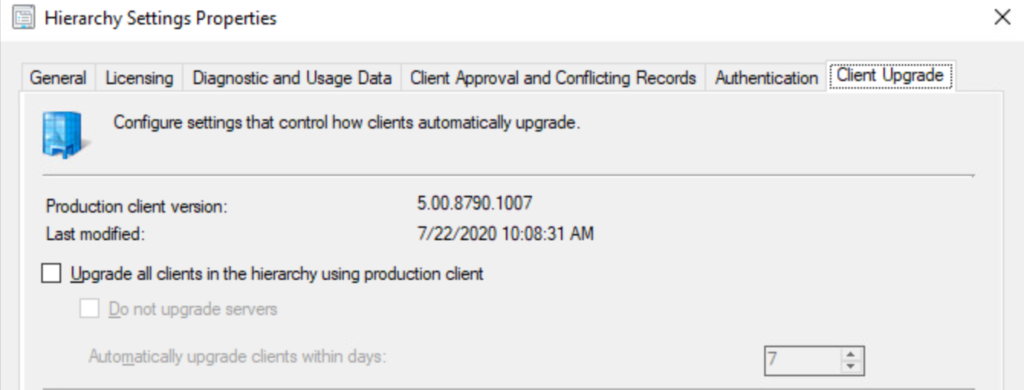
Optional: Downgrade the SCCM version. (make sure to disable the SCCM Auto Client Upgrade in the Hierarchy settings
3. Deploy it to the target devices
Optional:
Uninstall SCCM Agent – you can find the script HERE
Demo
Scenario 2: MEM to Workspace ONE
Microsoft now officially says that co-management is the future (not like some years ago where co-management was only a temporary solution). Working with co-managed devices in an on-prem domain or in hybrid scenario will add one additional step to the workflow compared to the SCCM standalone scenario.
Since the device is also Intune enrolled, we have to delete the device also from Intune.
Prerequisites
Please see the prerequisites in scenario 1. Scenario 2 has the same prerequisites as scenario 1 plus additional:
Before we can start the migration to Workspace ONE we need to disable co-management and the automatic enrollment to Intune.
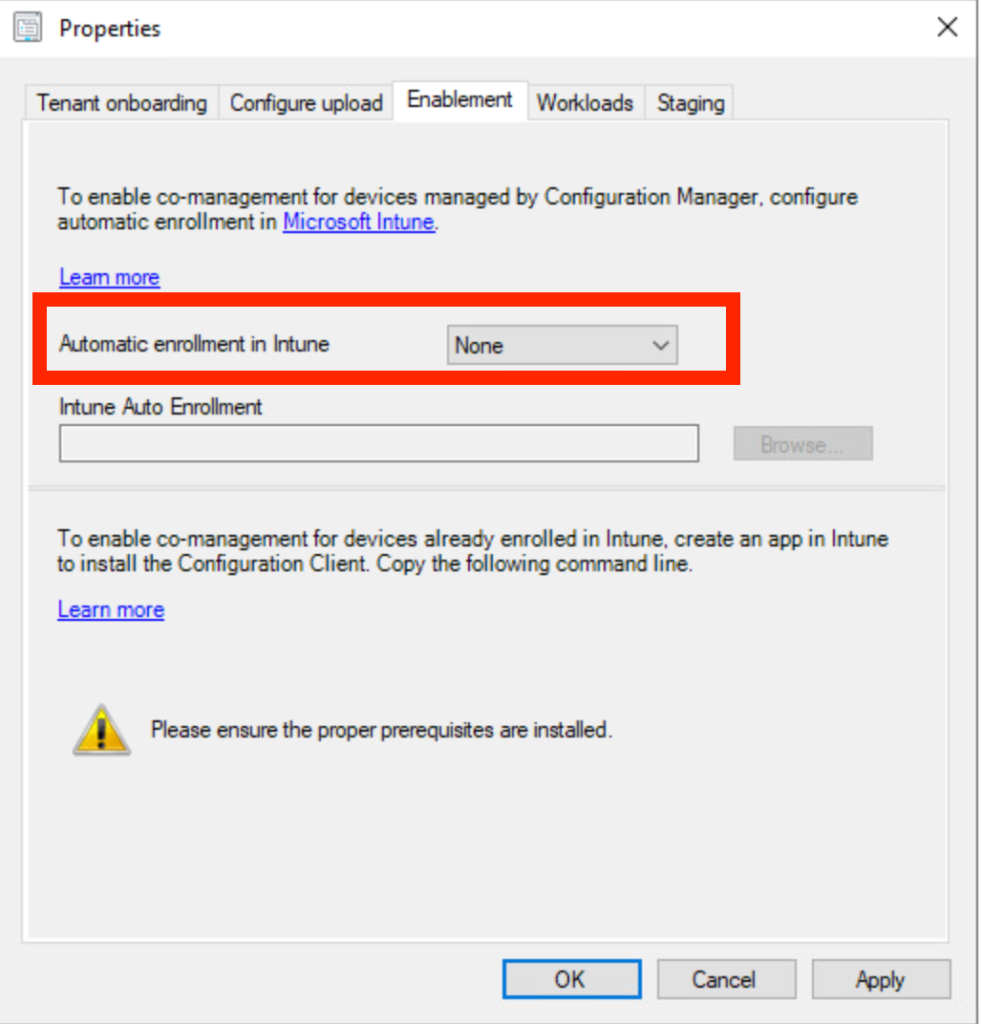
This step is required to prevent the device to reenroll again after we removed the device from Intune management.
If you want to manage the device with SCCM and Workspace ONE, make sure the SCCM Agent version is not higher than 5.00.8790.1007 (SCCM 1902 – without a hotfix). You would have to deploy the removal script first, then the new agent. After the device is registered in SCCM again and Intune is removed, you can start pushing down the Workspace ONE agent.
For the Intune removal we need a script to retire the device via API. To limit the access, you can create a role with the following permissions:
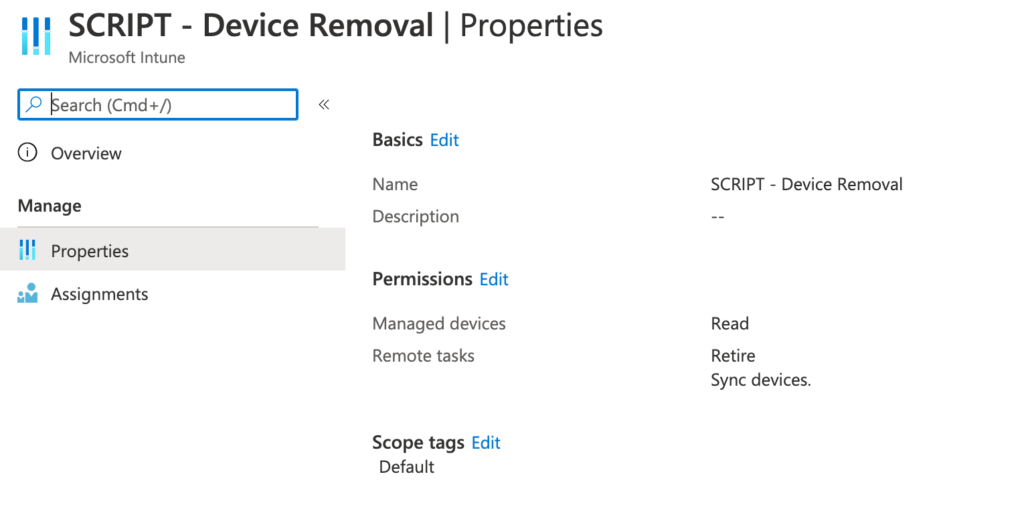
I also added the sync devices permission to force the sync of the commands if needed.
For testing purposes, I created a group with all Windows 10 devices with the following query:
(device.deviceOSType -startsWith "Windows") and (device.deviceOSVersion -startsWith "10.0")Of course you can restrict the permissions even more with Tags.
Last but not least, you need the script to do all the work. You can download the script on GitHub.
Caution
Be aware that if you manage applications with Intune, some applications might get uninstall during the retire process.
Migration steps
There are different ways to achieve the migration.
Approach 1:
In this approach you first remove the complete management and then install and enroll Workspace ONE – be aware, that you have a timeframe where the device is not managed.
- Push down the migration script to the device – either with Intune or SCCM.
- Script will start
- Remove Intune via API retire command
- Remove SCCM agent
- Install Workspace ONE agent with command line enrollment
Approach 2:
This approach is less risky since we first remove Intune management, then install and enroll the device to Workspace ONE and as last step we remove the SCCM agent (if required).
In this scenario we always have a device that is managed by either SCCM or Workspace ONE. Before starting the migration, make sure that the automatic Intune enrollment is disabled in SCCM.
- Push down the migration script to the device – either with Intune or SCCM.
- Script will start
- Remove Intune via API retire command
- Check if Intune management is removed
- Install Workspace ONE agent with command line enrollment
- Check if device is enrolled
- Remove SCCM agent
Demo
Scenario 3: AD + Intune to Workspace ONE
This configuration might be more uncommon, but it is easy to migrate. If a device is managed by Intune and is on-prem joined, you only need to retire the device in Intune and enroll it to Workspace ONE.
Prerequisites
You can use most parts of the script and the other prerequisites which are used in Scenario 2. But even easier you can download the script HERE.
If you want, you can use the Active Directory functions to deploy Workspace ONE. In my example I’ll just run the script, which downloads the Intelligent HUB and installs it after Intune management is removed.
Caution
Be aware that if you manage applications with Intune, some applications might get uninstall during the retire process.
Migration steps
- Push down the migration script to the device
- Script will start
- Remove Intune via API retire command
- Install Workspace ONE agent with command line enrollment
Demo
Scenario 4: AAD + Intune to Workspace ONE
This is the most complex migration scenario. Since the removal from Intune management will also cause a removal from Azure Active Directory. In this case we’re not only forced to enroll the device back to management, but also requires rejoining the device back to AAD.
Prerequisites
Scenario 4 has the most prerequisites since we need also a provisioning package (PPKG) for rejoining the device to Azure Active Directory.
Starting with the PPKG
See the walkthrough guide by Microsoft: HERE.
The listed prerequisite “Windows automatic enrollment” is not required and will get removed in the next step. So, no need to configure it.
Azure AD configuration
Unfortunately, Workspace ONE is not supporting Azure AD Bulk enrollment. This means, that we need to disable the automatic AAD enrollment in MDM. Navigate in your Azure Active Directory tenant to the Mobility section:
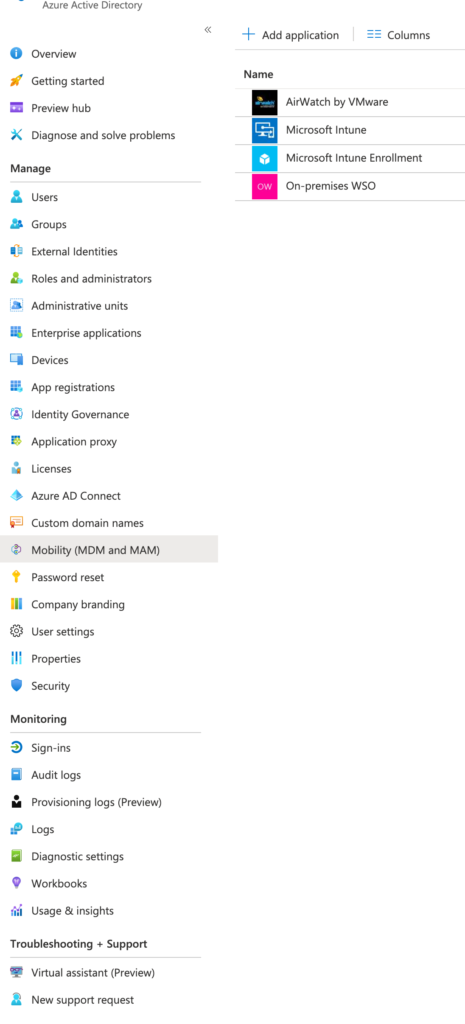
Make sure, that ALL MDM provider user scopes are set to “None”.
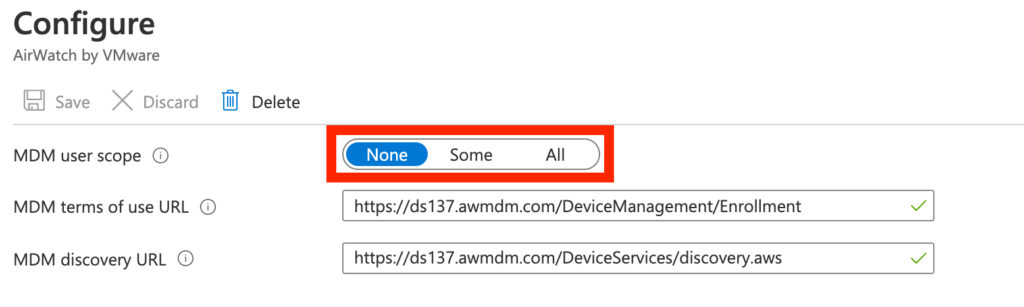
If you have only a subset of users that will enroll new devices you can create a separate group for it and set the user scope to “some”. In this case all users in this group can enroll their devices via AutoPilot or OOBE. But make sure the users will not be migrated to Workspace ONE since otherwise the migration will fail for those users.
After the migration, you can set it back to “All” or “Some” depending on your requirements.
Caution
Be aware that if you manage applications with Intune, some applications might get uninstall during the retire process.
Also, make sure the PPKG is working – otherwise you won’t have a working device anymore since the user can’t login.
Last but not least, keep in mind that during the migration phase, AutoPilot or AAD OOBE enrollment are disabled.
Migration steps
- Push down the migration script to the device via Intune
- Script will start
- Remove Intune via API retire command
- Device gets removed from Azure Active Directory
- PPKG gets applied to join the device back to AAD
- Schedule Task and a local administrator account gets created
- Restart
- User logs in again
- Schedule Task triggers the installation of the Workspace ONE agent with command line enrollment
Demo
Scenario 5: Reset the device
The cleanest way to migrate a device is running a reset / wipe command and reenroll the device during OOBE.
The easiest way would be using AutoPilot. In this use case you only need to switch the MDM authorities in Azure AD from Intune to Workspace ONE. After doing this switch make sure to wait some minutes – Azure needs some time to make the switch in the background.
If you run a reset or wipe command from the Intune / MEM console, the device gets reinstalled and will automatically enrolled to Workspace ONE due to the AutoPilot workflow.
If you don’t use AutoPilot, you can use a PPKG and unattended.xml do automate the enrollment.
Optional Improvements
There are several ways to improve the end user and administrative experience of the migration.
Windows 10 Splash Screen
Trevor Jones created an awesome Windows 10 Splash Screen with PowerShell.
You can integrate this splash screen to block the user interaction during the migration. This is highly recommended in the Intune scenarios and especially in all AAD scenarios since the user account gets temporary removed.
Workspace ONE enrollment tracker
We can combine the Windows 10 splash screen with a separate script to check the Workspace ONE enrollment status. This custom script will provide a check if the device is successfully enrolled, all profiles and all required applications are installed.
If you run the enrollment tracker together with the splash screen, the end user is unable to work until the device is fully migrated. This has the benefit of avoiding confusing end users as they see that something is happening in the background.
You can download the enrollment tracker here: GitHub
Please note, that the script works with API calls on the Workspace ONE environment. Depending on how many devices are migrated in parallel this can cause serious load on the API servers. Please check first with your VMware contact person if the server(s) can handle the high amount of API calls.
How the script works
With this script we are able to check the enrollment and installation status of the device. The script has the following command flow:
First, the script will check if Windows is running by checking explorer.exe – this was initial implemented for the Factory Provisioning scenario.
If Windows is running, the script will check the enrollment status first via registry and after the registry shows that the device is enrolled, the status get checked via API query.
After the check was successful, the profile installation status gets verified by API queries. Since Profiles will be applied directly after the enrollment is finished, the maximum check is 3 times with a sleep timer with 60 seconds.
In every normal deployment, this should be far enough to check the profile installation status.
Next the assigned apps get queried via API. This information will help to check the installation status with registry.
The maximum run time for ONE application is set to 60 minutes. After this time, the application gets marked as not installed and the next application gets verified.
Since there is no real ordering it could happened, that some applications are already installed while waiting for an application (e.g., scrip checks if Office 365 is installed but in the background Workspace ONE installs Adobe Reader, Notepad++ and so on).
Credential security
Since this script needs API credentials, we should make sure that those are secured and not accessible for everyone.
In my developed workflow, we need several files to make sure that accessing the API credentials is as hard as possible.
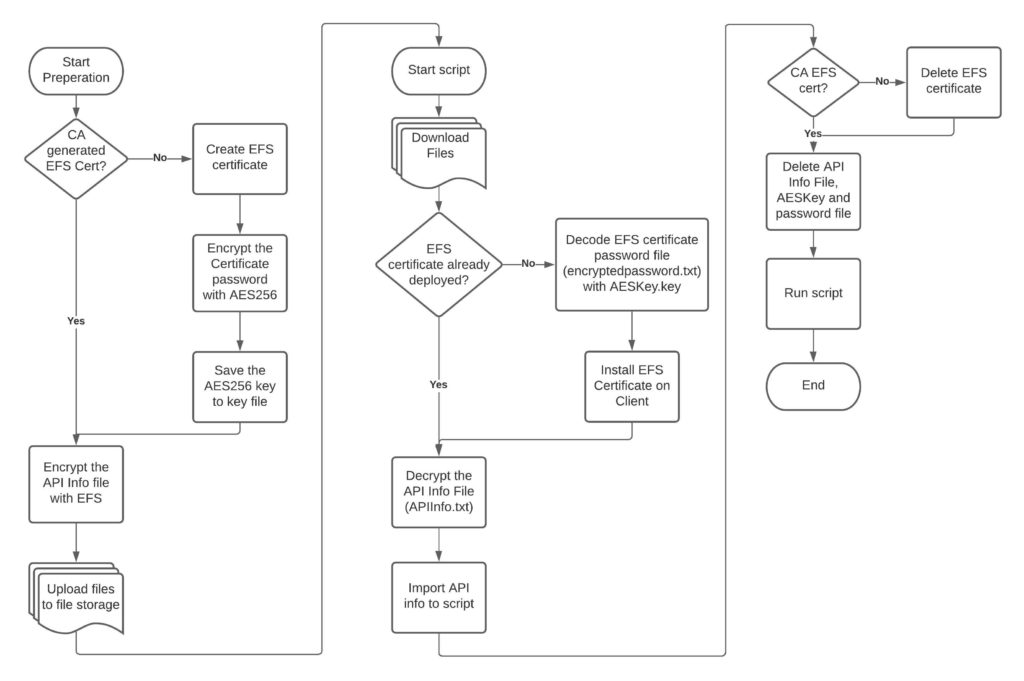
I’m using EFS certificates and a AES256 bit encrypted password for this EFS certificate. Only with this EFS certificate you are able to open the API file itself.
You can store the files e.g., on Azure Blob Storage (to learn more see HERE)
Overall, there are four files that you need:
- APICert.pfx
an EFS certificate which is used to encrypt the APIInfo.txt file. - encryptedpassword.txt
This file contains the certificate password and is encrypted with AES256 bit. - AESKey.key
This file will be used to encrypt the encryptedpassword.txt file. - APIInfo.txt
This file contains the API info (API Username, Password and API Key).
As you can see, you need the AESKey.key file to decrypt the encryptedpassword.txt file, to get the password for the EFS certificate. Only with this certificate you are able to decrypt the APIInfo.txt file.
To create the password file, you can use the following command:
#create Password file
$Key = New-Object Byte[] 32
[Security.Cryptography.RNGCryptoServiceProvider]::Create().GetBytes($Key)
$Key | out-file C:\Temp\CertKey.key
(get-credential).Password | ConvertFrom-SecureString -key (get-content C:\Temp\CertKey.key) | set-content "C:\Temp\encryptedpassword.txt"
PSAppDeployToolkit
If you want to inform your user BEFORE you start the migration, PSAppDeployToolkit is a quite easy way to do this.
See all features HERE.
Final video with the full implementation
Here is the final implementation with the splashscreen and the enrollment tracker running in the background. After all software is installed the enrollment tracker script restarts the device.
Take a look at the example script HERE.
As you can see in the script, I also uploaded the splash screen as ZIP file and also the enrollment tracker script. Basically you only need one script to deploy – all other sources are downloaded as needed.
Empowering customers in client management since 2012.
Empowering customers in modern management since 2018.
Richard
Hi Grischa,
i’m trying this bat file in our infra
msiexec.exe /i AirwatchAgent.msi /quiet ENROLL=Y IMAGE=n LGName=APAC_SIN DEVICEOWNERSHIPTYPE=CD ASSIGNTOLOGGEDINUSER=Y SECURITYTYPE=D USERNAME=staging@staging.com PASSWORD=12345 SERVER=https://aw.awmdm.com
but, the ASSIGNTOLOGGEDINUSER=Y is not happening, once the MSI installation completed, Hub app prompting for Group name. May I check, what am i missing here.
Grischa Ernst
Hey – please check the Shared device settings. Should be set to fixed or user based grouping.