Using WPA3 Wi-Fi Networks with Workspace ONE UEM
While the definition of Wi-Fi Protected Access 3 (WPA3) was published in January 2018 from the Wi-Fi Alliance there seems still not that much usage in the field. I got asked some week ago where we are with this and putted together a list and tested with a Android & iOS Device. While macOS has the same APIs as iOS , but the GUI is a bit different I broke it down for every single operating system.
Note: This Blog is coming out early July 2023 and is representing the current state.
Android
On Android there is no Differences between WPA or WPA2 or WPA3 , so you just can select the “WPA/WPA2” setting of Workspace ONE UEM and it will connect even to a WPA3 Network.

Documentation from Android Enterprise: https://developer.android.com/reference/android/net/wifi/WifiConfiguration
iOS
For iOS there are 3 APIs that can be used with the 23.02 UEM Version . You can select the “Any (Personal)” section or the “WPA2 Personal” or the “WPA3”. This is due to Apple having the WPA2 setting in the Encryption Type used for WPA2 and WPA3. The “Any” option is not filtering any WPA/ WEP version and will connect to the network as long as the SSID and the password matches. The option “WPA3” will only connect to WPA3 Networks.
This is the same for “WPA2 Enterprise” and “Any (Enterprise)” and “WPA3 Enterprise”as they use the same API for setting the Encryption type, so just select them even through the label is not 100% accurate.

the Documentation from Apple is available here:
https://developer.apple.com/documentation/devicemanagement/wifi
macOS
For macOS there are 2 APIs that can be used with the 23.02 UEM Version (might change in future) . You can select the “Any (Personal)” section or the “WPA2 Personal”. This is due to Apple having the WPA2 Setting in the Encryption Type used for WPA2 and WPA3. The “Any” option is not filtering any WPA/ WEP version and will connect to the network as long as the SSID and the Password matches.
This is the same For “WPA2 Enterprise” and “Any (Enterprise)” as they use the same API for setting the level, so just select them even through the label is not 100% accurate.

the Documentation from Apple is available here:
https://developer.apple.com/documentation/devicemanagement/wifi
Windows
Windows supports WPA3 as well as Wifi 6 since Windows 10 2004:
- WPA3-Enterprise 192-bit mode authentication.
- WPA3-Enterprise authentication.
- WPA3-Simultaneous Authentication of Equals (WPA3-SAE) authentication AKA Personal
Workspace ONE UEM does not have the interface to create the profile from the UI for WPA3 but as this is supported by CSP, we can create a custom profile and use that to configure the device.
Note : The certificate are not specified in the Wifi configuration so can be deployed in a separate profile if needed.
Create WlanXML
Configure the SSID on a Windows Machine using the Windows interface. Once created run the following command to export the XML.
netsh wlan export profile "My Network" folder=C:\tempYou can list all the wifi configured on the machine by using this command
netsh wlan show profilesIf you need to edit and want to understand the format the reference is available here :
WLAN Profile Schema : https://learn.microsoft.com/en-us/windows/win32/nativewifi/wlan-profileschema-schema
Also 802.1x use the OneX Format detailled here : https://learn.microsoft.com/en-us/windows/win32/nativewifi/onexschema-schema
Create custom profile
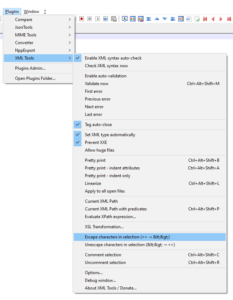
You will need to “escape” the WLAN profile
From < > to < >You can use notepad++ with the “XML Tools” plugin
Change {Device|User} to Device for machine profile and User for user profile and add the escaped WLAN XML into the Data section
Install Profile
<Replace>
	<CmdID>9c25464e-037d-4c0e-99a6-0c4eef5e4c44</CmdID>
	<Item>
		<Target>
			<LocURI>./{Device|User}/Vendor/MSFT/WiFi/Profile/{SSID}/WlanXml</LocURI>
		</Target>
		<Meta>
			<Format xmlns="syncml:metinf">chr</Format>
		</Meta>
		<Data> { WLan XML } </Data>
	</Item>
</Replace>
Note : The {SSID} variable need to match the real SSID and is case sensitive. If the SSID contains spaces you need to convert them to html. Example : My Network convert to My%20Network
Remove Profile
<Delete>
	<CmdID>bee0ccd6-64f2-47a8-9c98-42677cdd1526</CmdID>
	<Item>
		<Target>
			<LocURI>./{Device|User}/Vendor/MSFT/WiFi/Profile/{SSID}/WlanXml</LocURI>
		</Target>
	</Item>
</Delete>
XML Example
<Replace>
<CmdID>9c25464e-037d-4c0e-99a6-0c4eef5e4c44</CmdID>
<Item>
<Target>
<LocURI>./Vendor/MSFT/WiFi/Profile/My%20Network/WlanXml</LocURI>
</Target>
<Meta>
<Format xmlns="syncml:metinf">chr</Format>
</Meta>
<Data><WLANProfile xmlns="http://www.microsoft.com/networking/WLAN/profile/v1"><name>My Network</name><SSIDConfig><SSID><name>NdolCorpSSID</name></SSID><nonBroadcast>false</nonBroadcast></SSIDConfig><connectionType>ESS</connectionType><connectionMode>auto</connectionMode><MSM><security><authEncryption><authentication>WPA2</authentication><encryption>AES</encryption><useOneX>true</useOneX></authEncryption><OneX xmlns="http://www.microsoft.com/networking/OneX/v1"><authMode>machine</authMode><EAPConfig><EapHostConfig xmlns="http://www.microsoft.com/provisioning/EapHostConfig"><EapMethod><Type xmlns="http://www.microsoft.com/provisioning/EapCommon">21</Type><VendorId xmlns="http://www.microsoft.com/provisioning/EapCommon">0</VendorId><VendorType xmlns="http://www.microsoft.com/provisioning/EapCommon">0</VendorType><AuthorId xmlns="http://www.microsoft.com/provisioning/EapCommon">311</AuthorId></EapMethod><Config xmlns="http://www.microsoft.com/provisioning/EapHostConfig"><EapTtls xmlns="http://www.microsoft.com/provisioning/EapTtlsConnectionPropertiesV1"><ServerValidation><DisablePrompt>true</DisablePrompt></ServerValidation><Phase2Authentication><EapHostConfig xmlns="http://www.microsoft.com/provisioning/EapHostConfig"><EapMethod><Type xmlns="http://www.microsoft.com/provisioning/EapCommon">13</Type><VendorId xmlns="http://www.microsoft.com/provisioning/EapCommon">0</VendorId><VendorType xmlns="http://www.microsoft.com/provisioning/EapCommon">0</VendorType><AuthorId xmlns="http://www.microsoft.com/provisioning/EapCommon">0</AuthorId></EapMethod><Config xmlns="http://www.microsoft.com/provisioning/EapHostConfig"><Eap xmlns="http://www.microsoft.com/provisioning/BaseEapConnectionPropertiesV1"><Type>13</Type><EapType xmlns="http://www.microsoft.com/provisioning/EapTlsConnectionPropertiesV1"><CredentialsSource><CertificateStore><SimpleCertSelection>true</SimpleCertSelection></CertificateStore></CredentialsSource><ServerValidation><DisableUserPromptForServerValidation>true</DisableUserPromptForServerValidation><ServerNames /><TrustedRootCA>QWERTYUIOPLKJHGFDSAZXCVBNM</TrustedRootCA></ServerValidation><DifferentUsername>false</DifferentUsername><PerformServerValidation xmlns="http://www.microsoft.com/provisioning/EapTlsConnectionPropertiesV2">false</PerformServerValidation><AcceptServerName xmlns="http://www.microsoft.com/provisioning/EapTlsConnectionPropertiesV2">false</AcceptServerName></EapType></Eap></Config></EapHostConfig></Phase2Authentication><Phase1Identity><IdentityPrivacy>true</IdentityPrivacy></Phase1Identity></EapTtls></Config></EapHostConfig></EAPConfig></OneX></security></MSM></WLANProfile></Data>
</Item>
</Replace>Reference :
- WiFi CSP : https://learn.microsoft.com/EN-US/windows/client-management/mdm/wifi-csp
- WPA3 and Wifi 6 Support : https://support.microsoft.com/en-us/windows/faster-and-more-secure-wi-fi-in-windows-26177a28-38ed-1a8e-7eca-66f24dc63f09
