How to enable Windows devices to reset the Pin with Azure federated Domains
In today’s fast-paced work environment, seamless and secure access to Windows devices is paramount. Azure Joined Devices, combined with the Hello for Business Pin, provides a streamlined authentication process that helps users quickly access their Windows devices. However, there is a crucial detail that many organisations tend to overlook, especially when they have federated their domain with identity providers such as Workspace ONE Access or Okta. When a domain is federated with an IDP, the authentication process is routed through the IDP’s infrastructure. This adds an extra layer of security and verification, which is essential for protecting sensitive data. However, for the Hello for Business Pin reset to function correctly, it’s crucial to whitelist the IDP’s URL on Windows devices.
On an end user device to reset the Pin just click the “I forgot my PIN” as shown here:

In case the URL is not on the whitelist the following error will occur:
We can’t open that page right now.
For security reasons, you’ll need to visit the page from a browser or a different device. If you think you’ve reached this page because of an error, tell your organization’s IT support you can’t access https://yourIDP/sso

To solve this we need to create a Profile in UEM with the data of the Microsoft CSP listed here: https://learn.microsoft.com/en-us/windows/client-management/mdm/policy-csp-authentication#configurewebsigninallowedurls
Creating the Profile (UEM 23.06 and higher)
Click to add Profile and select “Windows (Beta)” :
Note: While writing this blog the Label was tagged with beta, in a future release this will be removed

Select the “Device Profile”:

Make sure you add the “Authentication” Payload and add the Hostname of your IDP to the “Configure Web Sign In Allowed Urls” . For multiple Domains , make sure they are separate by <strong><em>;</em> </strong>and do not add any https , dots or / to the URL , so really just the hostname.

Custom XML (UEM 23.02 and lower)
While it is pretty straight forward with the GUI , I want to share as well how it looks like if you do not have the GUI there and go with Custom XML.
Click to add Profile and select “Windows” :

Select “Windows Desktop” and then select “Device Profile”

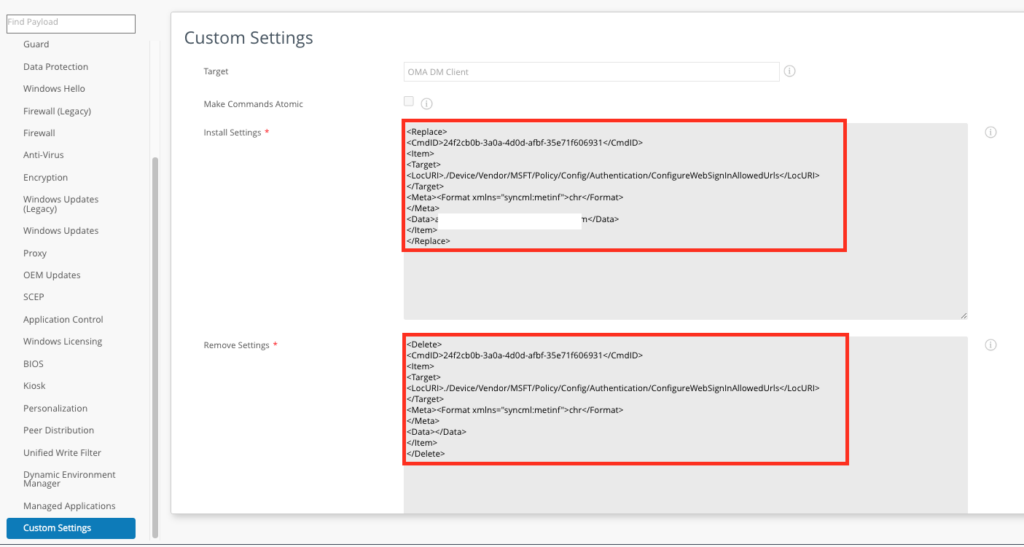
Select “Custom Settings” and insert the Following
Note: You have to update the “myIDPhost.com” with the hostname (or list of Hostnames, separated with ; ) of your IDP
Install Settings:
<Replace>
<CmdID>24f2cb0b-3a0a-4d0d-afbf-35e71f606931</CmdID>
<Item>
<Target>
<LocURI>./Device/Vendor/MSFT/Policy/Config/Authentication/ConfigureWebSignInAllowedUrls</LocURI>
</Target>
<Meta><Format xmlns="syncml:metinf">chr</Format>
</Meta>
<Data><em><strong>myIDPhost.com</strong></em></Data>
</Item>
</Replace>
Remove Settings :
<Delete>
<CmdID>24f2cb0b-3a0a-4d0d-afbf-35e71f606931</CmdID>
<Item>
<Target>
<LocURI>./Device/Vendor/MSFT/Policy/Config/Authentication/ConfigureWebSignInAllowedUrls</LocURI>
</Target>
<Meta><Format xmlns="syncml:metinf">chr</Format>
</Meta>
<Data></Data>
</Item>
</Delete>
Once done it should look like this:

The result
Once the Profile is installed the “I forgot my PIN” button will work and you get redirected to the IDP (Workspace ONE Access in my case)

vExpert, blogger and VMware & Omnissa champion. Worked 10 years as a Architect for a partner before joining VMware in 2017. Moved to Omnissa in 2024.