Using HTML widgets in Workspace ONE Launcher
When using Workspace ONE Launcher since some time there are HTML Widgets available. While I get a low number of request about this, from some conversations it seems that this solves a lot, but there are some unknowns to implement it. So this why I want to break the barrier and provide some easy instructions from the field on how it can be used.
Let us use the following Use-Case:
Customer has dedicated Android Devices on Omnissa Launcher with Workspace ONE UEM and want to register the Devices to Azure for Compliance enforcement. Once registered the Users have access to their personal Mail and Microsoft 365 Applications. As the customer does not want to sent Push Notifications and also the Weblink on the Home Screen was not wished. We wanted to go with a HTML Widget. So let us Create the HTML Widget to start the Azure Registration with with Hub.
Pre-Reqs:
- Launcher 21.09 or higher
- Any supported UEM Version
- Android Enterprise Work Managed Device
Creating a HTML Page.
So let us start on creating a Webpage with a Button.
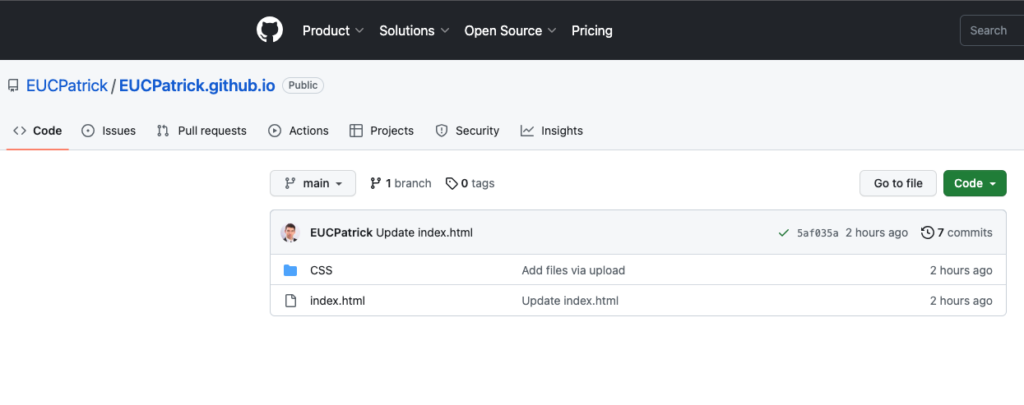
I used a simple HTLM Webpage with some standard Normalize CSS , all Source Code is shared in my GitHub Repository.
the Webpage I used :
https://github.com/EUCPatrick/EUCPatrick.github.io

the link that gets opened by the clicking of the Button is going to “awagent://com.airwatch.androidagent?component=conditionalaccess&partnertype=microsoft” to start the Device Registration on Workspace ONE UEM
if you want to test it you can use the following URL in you Widget:

Testing with this URL is fine, if you want to use it in production deployment please copy the files from my repository and host it within your Environment. there you can just modify the Test , Button , size etc.
Workspace ONE UEM Custom XML
As there is as of today (June 2023) no UI in the Workspace ONE Console , I used the following XML (Same Profile then the Launcher Payload) :
<characteristic type="com.airwatch.android.androidwork.launcher" uuid="568bc89d-1df8-4ce932-a041-e5a24acdb7ec"><parm name="ForYouWidgets" value="{"ForYouWidgets": [{"label": "<strong><mark style="background-color:rgba(0, 0, 0, 0)" class="has-inline-color has-vivid-red-color">Register to Azure</mark></strong>","type": "htmlwidget","value": "<strong><mark style="background-color:rgba(0, 0, 0, 0)" class="has-inline-color has-vivid-red-color">https://eucpatrick.github.io</mark></strong>","icon": "<strong><mark style="background-color:rgba(0, 0, 0, 0)" class="has-inline-color has-vivid-red-color">ic_media_tasklist</mark></strong>","viewType": "1"}]}" /></characteristic>You can define the Label and also the Headline and the URL shown in the HTML Widget.
while I used the ic_media_tasklist here:

there are multiple Icons available, just use one of this in the HTML Code.
“ic_action_accept”
“ic_action_bookmark”
“ic_action_brightness”
“ic_action_download”
“ic_action_edit”
“ic_action_favorite”
“ic_action_filter”
“ic_action_nightmode”
“ic_action_open_in”
“ic_action_print”
“ic_action_save”
“ic_action_search”
“ic_action_todo”
“ic_action_trash”
“ic_action_wipe”
“ic_communication_compose“
“ic_communication_downloads”
“ic_communication_info”
“ic_communication_mail”
“ic_communication_message”
“ic_communication_network”
“ic_communication_notification”
“ic_communication_question”
“ic_communication_reply”
“ic_communication_send”
“ic_communication_share”
“ic_media_camera”
“ic_media_cloud”
“ic_media_desktop”
“ic_media_device”
“ic_media_file”
“ic_media_files”
“ic_navigation_settings_gear”
“ic_navigation_settings_nut”
“ic_security_lock”
“ic_time_clock”
For changing the URL or the Label of the Widget just replace the red Highlighted Parts of the XML.
Device View
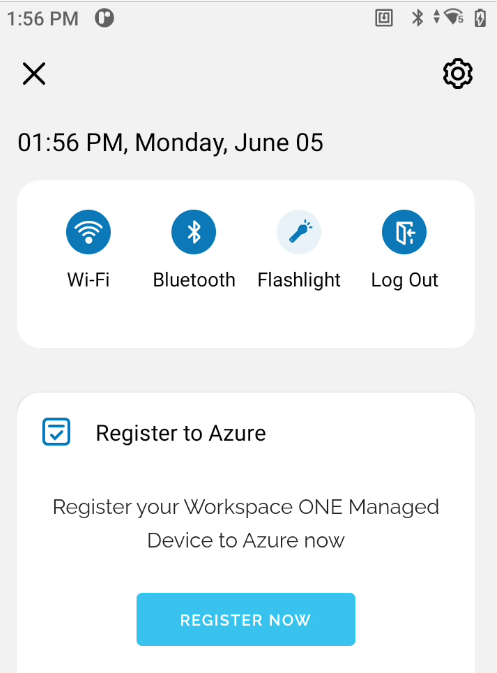
On the Device it looks now like this on the Notification bar:

Clicking the “Register Now” button will directly launch the Process.
Conclusion
For sure this is not limited to Registering Devices to Azure as this HTML Widgets are open to nearly every possible Use-Case. you can use even Lookup Attributes in the URLs and also it supports going to the full browsing experience from the Widget.
I know, that a lot of people would like to see this in Console of UEM directly selectable , but as of today (June 2023) it is only there with Custom XML. But the official Omnissa Documentation is showing it as a Custom XML Sample as well, so there should not be any Concerns on getting your custom HTML Widget via Launcher.
https://docs.omnissa.com/bundle/workspaceonelauncher/page/CustomXML.html
vExpert, blogger and VMware & Omnissa champion. Worked 10 years as a Architect for a partner before joining VMware in 2017. Moved to Omnissa in 2024.