VMware Mobile Threat Defense (Lookout) SAML Integration with Workspace ONE Access
When using Lookout or the new VMware Mobile Threat Defense you can create admins manually and have Passwords. While this is a good way for a POC, in Production the recommendation is to use SAML for the Admin Console to have MFA, passwordless and automatically Provision Admin Users that are entitled to access resources ad their permissions. While I tried to add SAML I found out that the console do not show the Settings on MTD / Lookout. So I had to work with Support. If you have VMware Mobile Thread Defense this will work over VMware support, while if you have Lookout Licences directly , you have to work with lookout directly to get it enabled. I want to share here the things you have to deliver to the Support Team and also the Settings I used to get it working with Workspace ONE Access.
Groups & Permissions
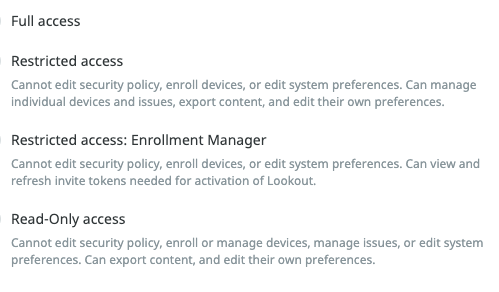
there are 4 Roles available to be used in MTD/Lookout. This is are the 4 roles in detail:
As we want to match the Roles to Groups in Access this names need to be also shared with Support , so they can enter the correct names for the roles. On MTD/Lookout Side they then check in the name is in the SAML Attribute “memberof” . Please note this is key sensitive.
So note the Group names for this 4 Roles:
| Role | Group on my WS1 Access Environment |
| Full Access | |
| Restricted access | |
| Enrollment Manager | |
| Read-Only access |
You can already import the 4 groups to Workspace ONE Access , as you will need them later.
Requesting SAML for Admin Console (Lookout/ VMware Mobile Threat Defense)
Now as you have the Group names collected you need to open a Support Ticket (with VMware if it is VMware MTD or with Lookout if your Licences come from them directly ) with your SAML Data. Therefor I have prepared a list , so you can first collect all the data and do not need to go back and forth with Support.
The “Email Domain” is optional, but recommended as the SP initiated flow will not work otherwise. Also note that if you have UAT and Prod the Email Domain needs to be different if you do SP initiated Flow form the Lookout Login mask to redirect to your SAML IDP.
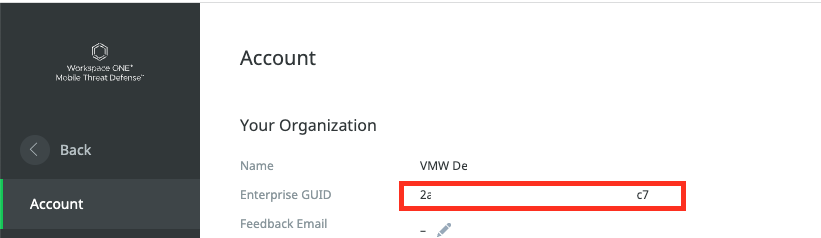
The “Enterprise GUID” can be seen on the Lookout Console in the System / Account Screen. Note it Down as you will need to share it with support as well as you have to add it in the SAML Settings on Access.
For the “Redirect URL” and the “IDP Metadata” URL just use the Pre-Filled URLS and Update your Tenant URL of Workspace ONE Access.
| Email Domain | @mycompany.com |
| Enterprise GUID | |
| Redirect URL | https://MYWORKSPACEONEURL/SAAS/auth/federation/sso |
| IDP Metadata: | https://MYWORKSPACEONEURL/SAAS/API/1.0/GET/metadata/idp.xml |
| Roles | Group on my WS1 Access Environment |
| Full Access | |
| Restricted access | |
| Enrollment Manager | |
| Read-Only access |
If you have all the Values Filled , you re good to open a Support request to ask for a SAML Integration
Once you get the Feedback that the Backend is prepared you also get 2 URLs back
| Identifier (Entity ID) | https://mtp.lookout.com/sso/saml/CustomerName/metadata |
| Reply URL | https://mtp.lookout.com/sso/saml/CustomerName/acs |
Now it is Time to prepare the Workspace ONE Access part.
Settings on Workspace ONE Access
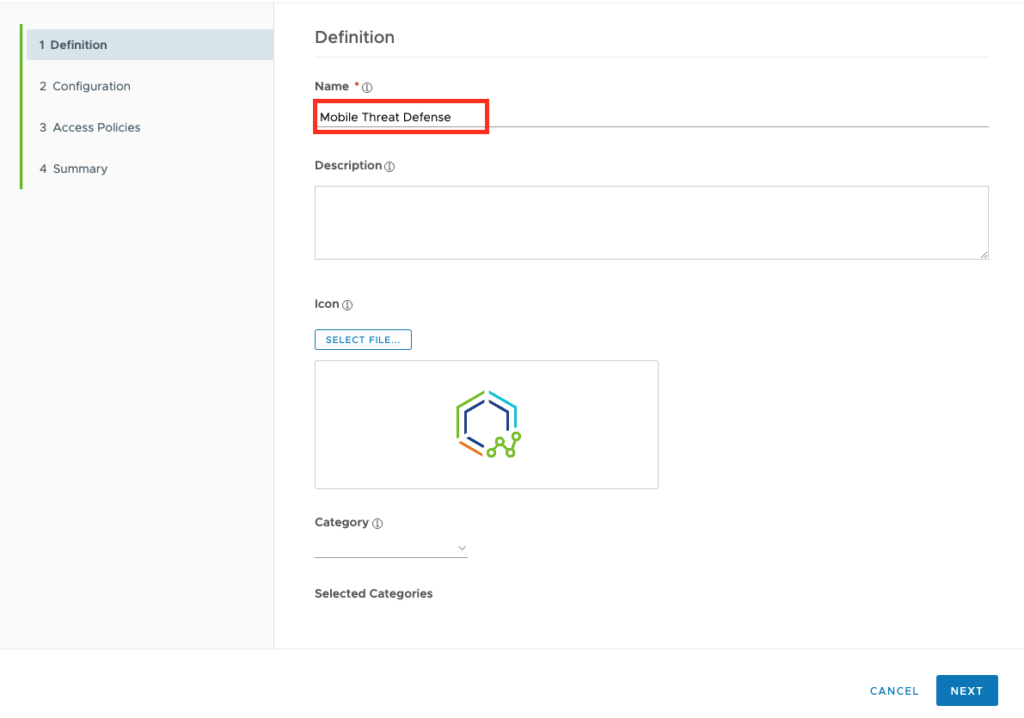
Login to Workspace ONE Access and go to Web Apps. Click to the “New” Button and Create a new SAML Application. Give it a Name and optionally a Icon, then click to “NEXT”
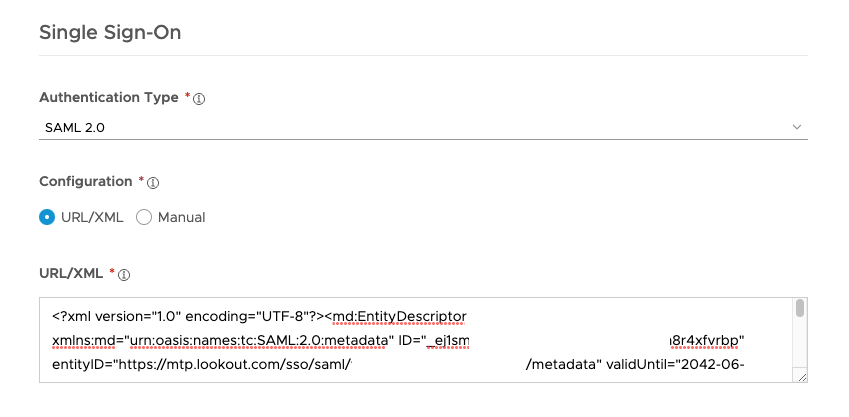
Now , open the “Identifier (Entity ID)” URL (something like https://mtp.lookout.com/sso/saml/CustomerName/metadata) from the Support Feedback and Copy out the content displayed on that URL.
Paste the content in the URL/XML Field and make sure you have SAML 2.0 selected on the Authentication Type:
Open the Advanced Properties and go to the “Custom Attribute Mapping”

Insert the following Values (Update the “ent” Value !!) if you use similar settings then in my Environment. If you use other Attributes make sure the Names do not change, just update the Value fields.
| Name | Format | Value | Description |
| givenname | Basic | ${user.firstName} | This should be the First name of the Admin |
| sn | Basic | ${user.lastName} | This should be the last name of the Admin |
| Basic | ${user.email} | This should be the mailadress of the Admin | |
| upn | Basic | ${user.email} | This should be the User Principal Name of the Admin |
| ent | Basic | dxxxxxa-exx5-axx4-axxb-28xxxxxxx5 | this is the Enterprise GUID, listed in the Settings on MTD/Lookout (System / Account ), I am showing here a Sample of the Format |
| memberof | Basic | ${groupNames} | This is the Value for the Groups to map the Roles the Admin gets in MTD/Lookout |
Once done Click to “NEXT, select the Access Policies for this Application
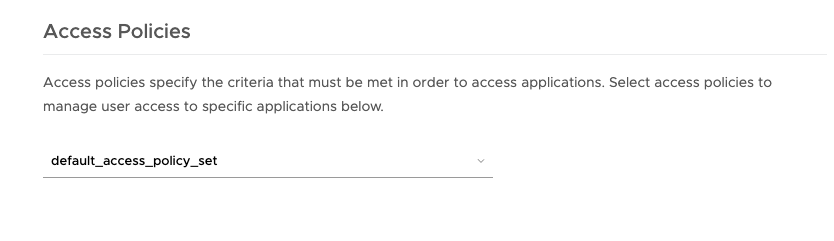
Now Click to “NEXT” & “SAVE & Assign
Select the 4 groups you have defined for the Roles and add them here as “User-Activated”.

Once Saved you are ready and can access MTD/Lookout with SAML Authentication , provision Admin Users with the correct associated Role.
vExpert, blogger and VMware champion. Worked 10 years as a VMware & Microsoft consultant for a partner before joining VMware in 2017.