Get started with Play Integrity and Omnissa Workspace ONE UEM
As we saw some of false positive of SafetyNet Attestation on Android as part of compromised detection that customers may experience, like documented here https://kb.omnissa.com/s/article/83272, there are major improvements on the with the newer Play Integrity API released by Google (https://developer.android.com/google/play/integrity) and also used by Workspace ONE UEM. Troubleshooting issues is just so much easier , so let us have a look in this blog to set it up and also check out a Compromised Device that is not compatible with Play Integrity as a sample case. While for Customers currently using SafetyNet Attestation the Migration is just a UEM Update, I want to cover also how to set it up from scratch.
Make sure to meet the following Requirements:
– Android GMS Device enrolled in UEM
– UEM 23.10 + (GooglePlayIntegrityIntegrationFeatureFlag enabled , but should be Default in 23.10 UEM)
– Android Intelligent Hub 23.05 +
Setup
To setup the Play Integrity Integration in UEM we first need to enable it in the Console. If you have SafetyNet already enabled via custom settings it will automatically be used after the UEM 23.10 Update. If not , here the settings to enable it.
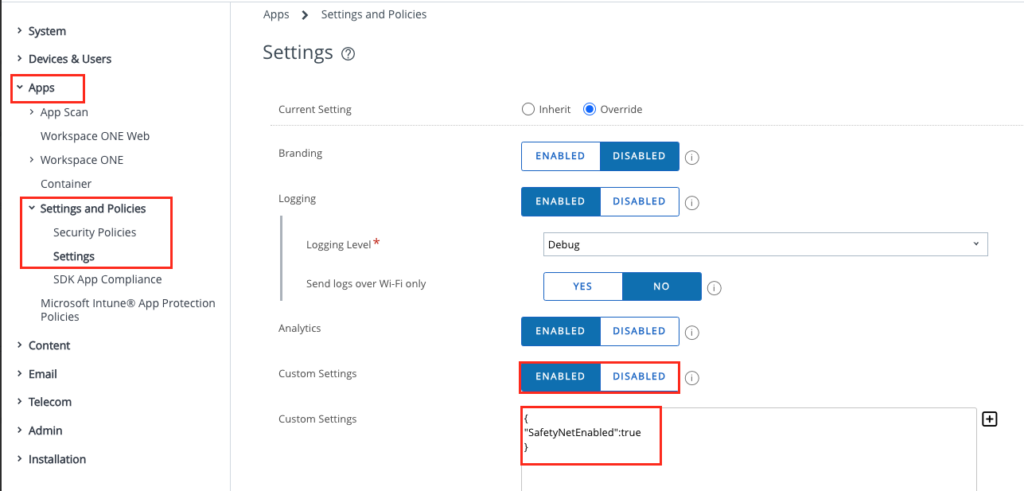
Go to the settings in the UEM Console, then “Apps” and “Settings and Policies” and then “Settings”. Activate the Custom Settings if not already done and add the Custom Settings like shown here:

Just copy out the following and add it to the Custom Settings (If you have already some settings in , just add the SafetyNetEnabled set to true in Comma-separated with the existing values)
{
“SafetyNetEnabled”:true
}
If you want to enable the Enterprise / Device wipe feature in the SDK then navigate to the settings in the UEM Console, then “Apps” and “Settings and Policies” and then “Security Policies”. Here the Compromised Detection can be turned on and also the Play Integrity Evaluation can be set to “all” or just “Hardware-backed”

UEM Console, Single Device View:
Once activate and the next device check-in happens the Play Integrity Status is shown including the last Scan date & time.

Compromised Device Demo:
While it does not happen to often in a real life scenario that a Device is compromised , I wanted to verify with my custom Device that is not Google Play certified as some chips are not compliant installed.
On the Device the Intelligent Hub clearly shows a message of the compromised Status to the User (only if there is no Wipe set in the SDK Settings or the

on the UEM Console on the Device View it also shows as Compromised:

to view more details just click to the “Compromised Detection Tab on the single Device View.

On this Tab the exact Reason and the Severity is shown :

While the Screen before have been on a Enrolled device with disabled Compromised Detection Wipe: No to the more interesting part : What happens when I directly wipe the device (via SDK Settings) ?
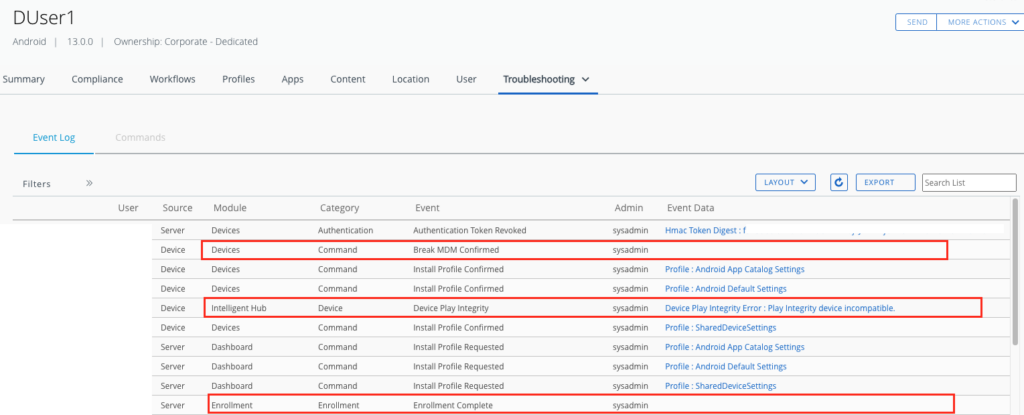
For better troubleshooting the exact reason of the Integrity API Check failure will be captured in the Logs and is visible even after the wipe happend. If we have a look on the “Troubleshooting” Tab of the wiped Device we see from Enrollment , Play Integrity Check (Including Result) and the Break MDM Command(Wipe) .

This is a major improvement from Google on providing a more granular reason and also from Omnissa to display this to the Admins in UEM.
vExpert, blogger and VMware & Omnissa champion. Worked 10 years as a Architect for a partner before joining VMware in 2017. Moved to Omnissa in 2024.